A small video and/or audio recording of yourself narrating a slideshow presentation can help maintain audience engagement. You can use Zoom to record a slideshow presentation so as to include a video of yourself narrating the slideshow in a small rectangular video placed along the side of your slideshow.
You can also use Zoom to record a slideshow with only your voice narration (i.e. no video of yourself).
Considerations:
- Recording to the local computer (available to all Whitman Zoom account holders) yields a higher quality recording file as opposed to recording to the cloud. Recording to the cloud (for faculty and staff only) offers easier recording distribution options.
- Although you are narrating a presentation, try not to read your slides verbatim. Reading from the slides can be frustrating for the audience. Your narration should be an enhancement to your slideshow.
- We suggest you set the aspect ratio of your slides to 16:9 (widescreen) in your slideshow program, but this is not absolutely necessary. This setting gives you more slide real estate room to work with when designing your presentation. Newer displays, laptops and projectors are mostly widescreen, so designing the slides in widescreen will not distort the proportions of your slides during your show, or add black bars to your slideshow.
- The placement of your video narration (in the recording) will be to the right of the slideshow presentation.
- During video recording, wear clothes that contrast with the background you are recording against. Avoid wearing stripes.
- A built-in laptop webcam and microphone should be sufficient to capture decent quality audio and video - if you record in a quiet area with a plain, evenly-lit background behind you. If a quiet area is not available, a headset or earbuds with a microphone can help to capture only your voice and eliminate background noise. Do not video record with an outside window directly behind or to the side of you - even the best webcams will have difficulty capturing useable video when pointed at direct light or side light. An evenly colored wall behind you works great.
- If you need a USB lapel microphone or USB webcam, please contact IMS to arrange to pick one up. ims@whitman.edu to reserve equipment. After you contact IMS, you can make an appointment to for pick it -up equipment at:
https://whitmancollege.as.me/helpdesk
...
- Sign into your Zoom account via the Whitman College Zoom web portal: whitman.zoom.us (click on SSO sign-in) and enter your Whitman username and password.
- Click on Settings in the left-hand side menu, then select the word Recording (near the top of the window). This opens up the recording settings for your account.

- Zoom processes and stores recordings in one of two places (local is the only option for students).
Local - For Higher in quality as compared to Cloud recordings and available to all Whitman zoom account holders, stored in the hard drive of your laptop or computer. The video file is processed on your local computer.
OR
Cloud - For Faculty and Staff only. Processed and temporarily stored in the Zoom cloud for 30 days (not available to students). Links to the recording in the Zoom cloud can be easily shared.
One or both of these options must be turned on in order to record (the white circle in a blue slide toggle indicates the feature is available and turned on).
Note: Local recording processes and creates a file after you end your meeting onto your computer's hard drive. This processing can take a few minutes, depending on the length of the recording. We recommended not shutting down and not logging off from your laptop or computer until that processing is done. There is a converting video popup window with a progress taskbar that estimates the time left to convert the file.
Cloud recordings are processed on a server, shutting down or logging off your computer will not affect the processing of the recording. Zoom will send you an email when the file is ready. - Recording to the Zoom cloud provides more options (like link sharing, file availability limitations/expiration, download prevention, and more). Zoom Cloud recordings can create several files for one recording session. Most of the time, you only need one type of filethose files, but if you plan on extensively editing the recording (beyond simply trimming the beginning and end) then consider the following.
- Recording active speaker with shard screen (recommended, this is the file you should always have)
- Record gallery view with shared screen (optional - shows gallery view by default, then automatically switches to the active speaker - all in the top right of the recording)
- Record active speaker, gallery view and shared screen separately (optional - creates three separate files which can be used in post production editing - advanced users only)
- Record an audio only file (optional - for post editing of recordings)
- Optimize the recording for 3rd party video editor (scroll further down under "Advanced cloud recording settings" - use this if you plan on editing this recording in a video editing program - for advanced users only)
...
- Open the Zoom app and your PowerPoint slides (or other slide presentation application). Do not launch the slideshow yet.
- In the Zoom app Home screen, click on the orange New Meeting icon

- If presented with the following pop up window, 1.) select "Test your Speaker and Microphone" and follow the prompts in the pop up windows to test the speaker and microphone and then select "End Test" 2) Select "Join with Computer Audio"

If you don't see the above window, you can and should test your audio settings at the beginning of your Zoom meeting, before you start the recording.
In the Zoom meeting control toolbar (near the bottom of the Zoom Meeting window), look for and select the upwards chevron next to the microphone icon in the lower left of the zoom toolbar, then click on Test Speaker & Microphone...
Follow the prompts in the pop up windows to test the speaker and microphone and then select "End Test" - You should see a video image of yourself in the main Zoom meeting screen. If not, check that video icon in the lower left of the screen does not have a slash through it. It should look like this:

- Click the “Share Screen” button on the bottom toolbar.

Choose your open PowerPoint window from file selection window (the window you select will be framed in blue), then click on Share button in the lower right
- Go to PowerPoint and start your slideshow.
- You will see a small window with video of yourself floating above the slideshow. This video will not overlap your slides in the recording, but it will be placed next to your slides in the recording. You can make this small video window larger to make the recorded size larger. To resize, make sure the larger blue rectangle icon is selected in the upper left of the window (1), and then hover the mouse over the lower right corner of this window to display a double arrow (2). Once you see the double arrow click and drag the arrow diagonally to resize the window. Let go of the mouse when you have resized to your liking. You cannot resize it to make it larger than the actual slide show.

- At the top toolbar, choose the ellipsis labeled More, then choose “Record on this Computer” (students, faculty and staff) or "Record to the Cloud" (faculty and staff only) from the menu that pops up. Your lecture is now recording.


- Start your lecture. Click the mouse anywhere in the first slide that is showing. Advance your slides with the right arrow key; return to a previous slide with the left arrow key.
- When you are ready to stop the recording, click on the ellipsis labeled More in the top floating toolbar toolbar (if you don't see this toolbar, hover your mouse on the top edge of the shared screen to make it appear), then select Stop Recording.
- Click “End Meeting” on the bottom right of the meeting screen.

Then click “End Meeting for All.”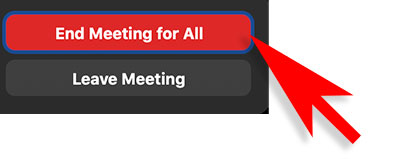
A box will pop up telling you that Zoom is converting your meeting recording.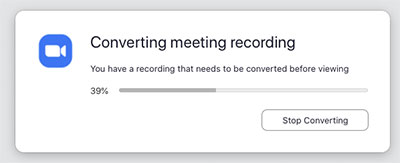
When the conversion is complete, the recording will be saved on your hard drive. When the recoding is finished converting, you can open your zoom account profile at whitman.zoom.us and preview it in the recordings section.
...