If you want to know the basic settings you can use when scheduling a Zoom meetingfor scheduling a Zoom meeting, this is the article for you. Note that this article addresses scheduling from the web portal, but the options are the same for the Zoom for Meetings Client. For a complete breakdown of all account settings, see, Complete Zoom Account Settings.
When scheduling a meeting, follow the basic outline below. There are
...
a minimum of 2 settings that you need to specify when scheduling a Zoom meeting - and, in fact, one of them is not required, it is just a good idea.
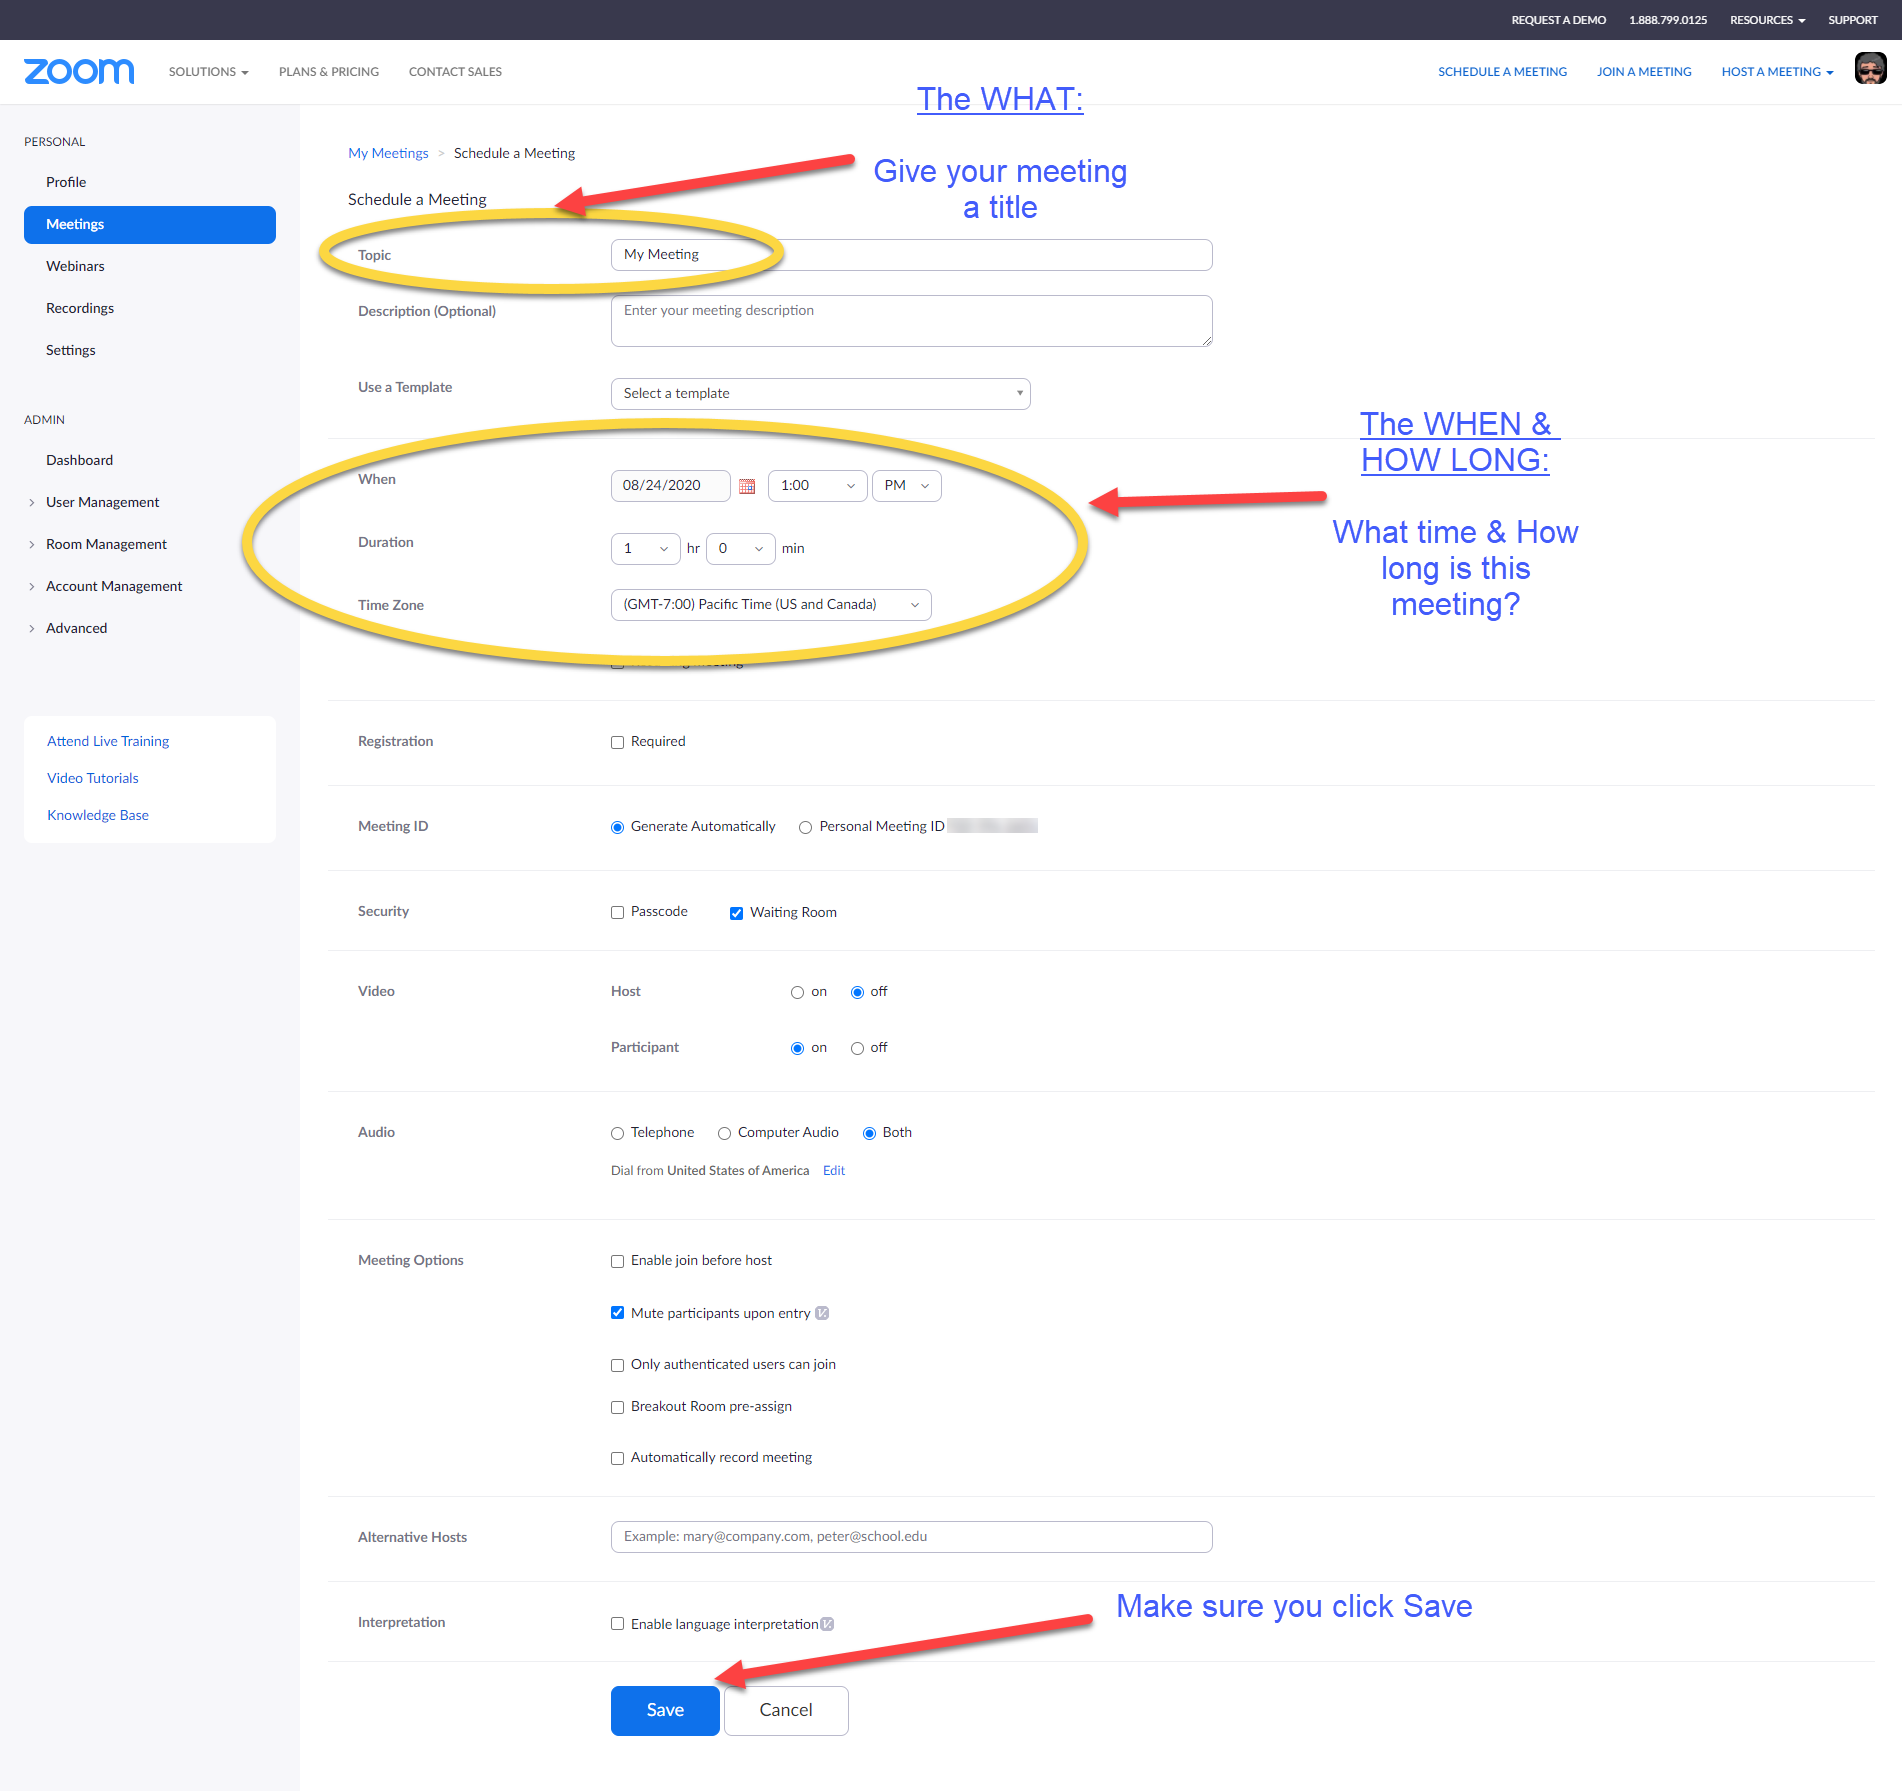
- The WHAT - A good practice to give the meeting a topic.
- The WHEN (& HOW LONG)
- The SECURITY
And of course, Don't forget to click SAVE
Here is how to start. A run-through of meeting options is below. The most important sections are in blue and circled in the graphic.
...
- - required
In addition to these 2 minimum settings, there are others that you should be aware of, they are all discussed below:
Start by signing into your Zoom account via the Whitman web portal: whitman.zoom.us
Make sure you are
...
in the Meetings section of your account. If you are not sure where that is, click on the word Meetings in the far left hand
...
column of words. If the word
...
"Meetings" is displayed as white on blue, then you are in the right place. Refer to the steps below to schedule your meeting (a visual guide is also below):
- Click on the button that says Schedule a Meeting on the far right part hand side of the window . This opens up to open a schedule meetings form, with the basic settings you can set for a meeting. Here is a breakdown of each of these settings page this form (essential settings items are in blue below):
- Topic: The name of your meeting, this can be anything from "Office Hours" to a particular class section. If left blank, your meeting will be described as "X's meeting," where X is your first (given) name as stored in your profile.
- Description: More details, but completely and optional.
- Use a Template: Normally not used, but if you saved a particular meeting as a template you can select the template from this drop down menu. If you use a template, it will fill out the Topic field in for you with whatever was stored in the template.. If you anticipate creating many of this same type of meetings, you could save these settings as a template and recall the template to quickly set up other meetings.
- When: Select a Date and start time Start Time for your meeting. The drop down times are listed in 30 minute intervals, but you can choose any specific start time you want by typing entering it in into the box and clicking on the pop-up box immediately below the time you that confirms what you just entered.
- Duration: Select how long your meeting will last. Only 15 minute increments are allowed. This is a soft ending time, and your meeting will not end if you go past the duration (unless you join another meeting).
- Time Zone: Select the time zone that you are in. Any invitations you send out will specify this time zone.
- Recurring meeting: Tick this box if this meeting will be a regularly scheduled meetingrepeat on a daily, weekly, monthly basis. If it is a one-time only meeting, leave it blank. If it is a recurring meeting, see the options are below
- Recurrence: Choose either : Daily, Weekly, Monthly, or No Fixed Time - PRO TIP: - using a "No Fixed Time" meeting is a great way of creating meeting meetings that will use the same invitation/link that does not change for all occurrences of the meetings - even when the meeting time changes from one day to the next. See this page for more information: Creating a Recurring Meeting of No Fixed Time.
- Repeat every: Select the frequency of the recurrence as appropriate. If choosing weekly, make sure you choose the days of the week you want this meeting to occur on
- End Date: Choose a date for these meetings to end
- Registration: (optional) - tick the required box if you want to force attendees to register before your meeting. Normally not used.
- Meeting ID: Let Zoom generate the meeting ID automatically. This is the recommended setting for almost every meeting.
- Security: You must tick at least on of the two options:
- Passcode - Select a passcode for your attendees to enter before they are admitted into the meeting. This passcode is not the same as your password for your account.
- Waiting Rom - Select this to place all attendees into a waiting room, so that you can admit them into the meeting. This is a security feature that allows you not to admit attendees you do not recognize.
- Video: Select the camera/video settings for you (as the host) and if you want your camera on or off from the very beginning of your meeting. Make a similar selection for your attendees. There is no recommended setting. Having them both on from the beginning can make it easier to interact visually right away. The option of having the video off at the start of a meeting allows your attendees to turn on the video when they are ready to be seen.
- Audio: Select Both. This gives your attendees the option of dialing into the meeting with a telephone if they prefer. Sometimes audio is better produced through a phone call. This can come into play when a participant is having connectivity issues.
- Meeting Options
- Enable join before host - If you do not mind attendees possibly arriving at your meeting before you, then check this. If you are using a waiting room, the attendee all attendees (except alternative hosts) will be in the waiting room, until you join start the meeting and admit them. If you do not tick this box, and someone tries to join, they will simply be presented with a message that says they will have advises them to wait for the host to start the meeting
- Mute participants upon entry - This makes sure that all guest microphones are turned off when first joining a meeting, or when rejoining from a breakout room. If microphones are muted, you have to ask permission to unmute a microphone. Each participant has control over when they activate their microphone.
- Only authenticated users can join - This prevents anyone outside of the Whitman.edu domain from joining a meeting. If you have guests from outside of whitman visiting Whitman participating in your meeting, do not check this box
- Breakout Room pre-assign - An advanced feature that allows you to assign participants into groups, before the meeting starts. Breakout rooms can also be created after a meeting starts. If your meetings do not have many attendees, then it is recommended that you do not tick this box and use the Breakout room function during a meeting.
- Automatically record meeting - This allows you to record your meeting to the Zoom cloud automatically. Cloud recording Recording to the Zoom cloud is not available for all Zoom accountaccounts. Local recording is available to all Whitman zoom accounts.
- Alternative Hosts: Place the email address of another Whitman Zoom account holder that can serve as an alternate host. The other account must be a Whitman Zoom account and be of the same level as your account (i.e. a licensed account) This . An alternative host could be a colleague, or a TA.
- Interpretation: This feature allows you to assign a person (or service) to interpret a meeting live. If you are interested in having language translation, please contact IMS@whitman.edu for more information.
- Click on the blue Save button
- You will be presented with a summary of your meeting. In that summary there are a couple of very useful items:
- Invite Link: a web link/URL for your meeting is displayed. You can highlight, copy and paste the URL to share it with other.
- Copy Invitation: Select this to copy the entire invitation to your meeting, including any access phone numbers. This copies it to your clipboard
- Add to: Google Calendar, Outlook Calendar or Yahoo Calendar. Use these buttons to place the meeting in your preferred calendar.
| Info |
|---|
|

Related articles
| Filter by label (Content by label) | ||||||||||||||||||
|---|---|---|---|---|---|---|---|---|---|---|---|---|---|---|---|---|---|---|
|
...